

 # Use case
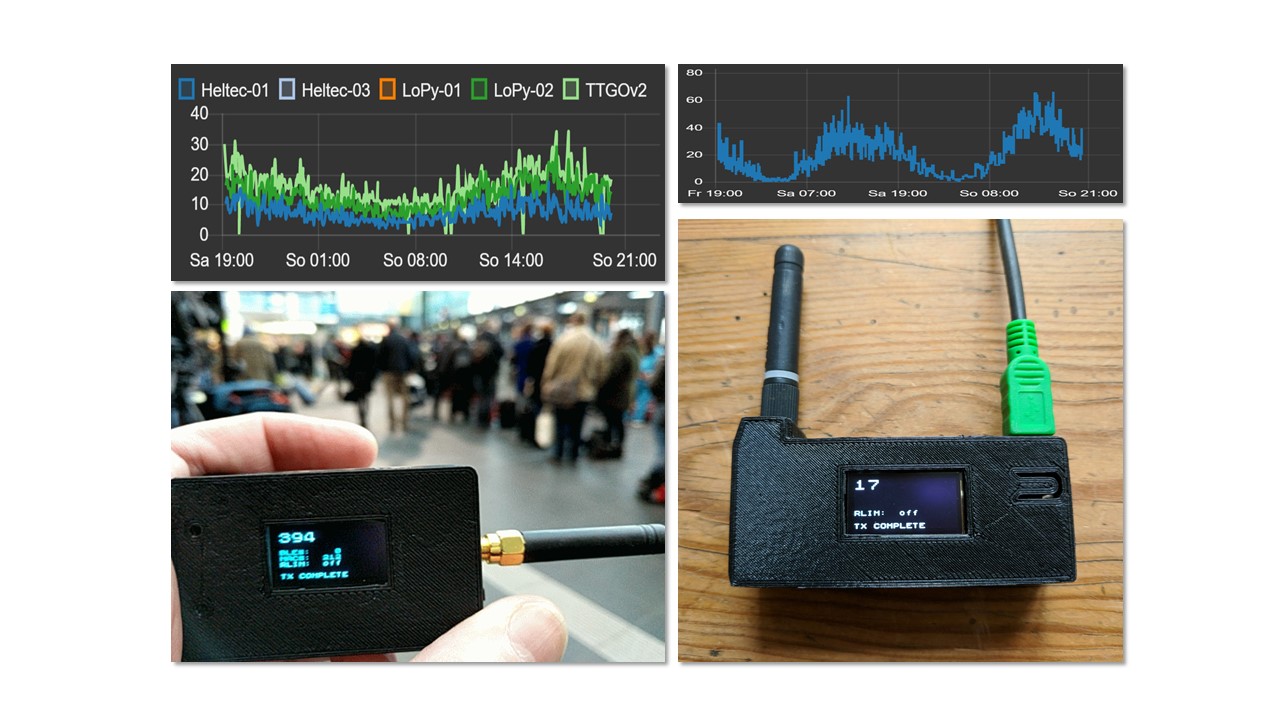
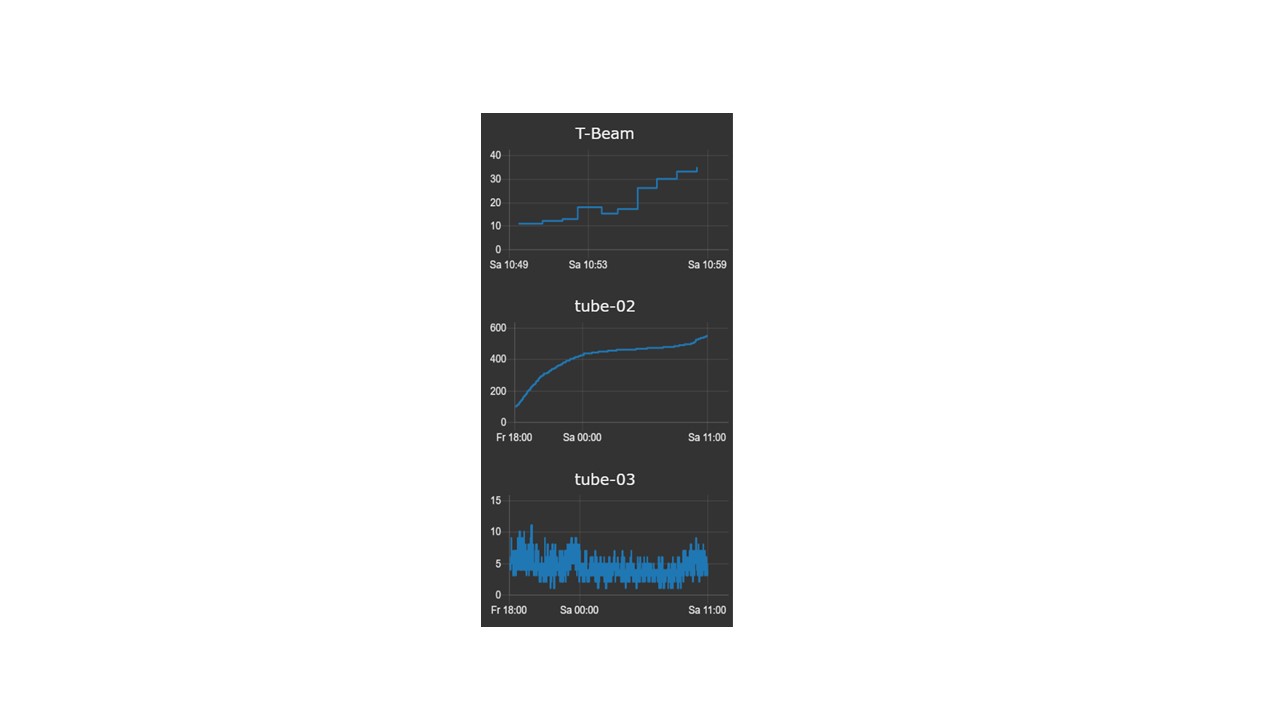
Paxcounter is a proof-of-concept device for metering passenger flows in realtime. It counts how many mobile devices are around. This gives an estimation how many people are around. Paxcounter detects Wifi and Bluetooth signals in the air, focusing on mobile devices by filtering vendor OUIs in the MAC adress.
Intention of this project is to do this without intrusion in privacy: You don't need to track people owned devices, if you just want to count them. Therefore, Paxcounter does not persistenly store MAC adresses and does no kind of fingerprinting the scanned devices.
Data is transferred to a server via a LoRaWAN network, and/or a wired SPI slave interface.
You can build this project battery powered and reach a full day uptime with a single 18650 Li-Ion cell.
This can all be done with a single small and cheap ESP32 board for less than $20.
# Hardware
**Supported ESP32 based boards**:
*LoRa & SPI*:
- Heltec: LoRa-32
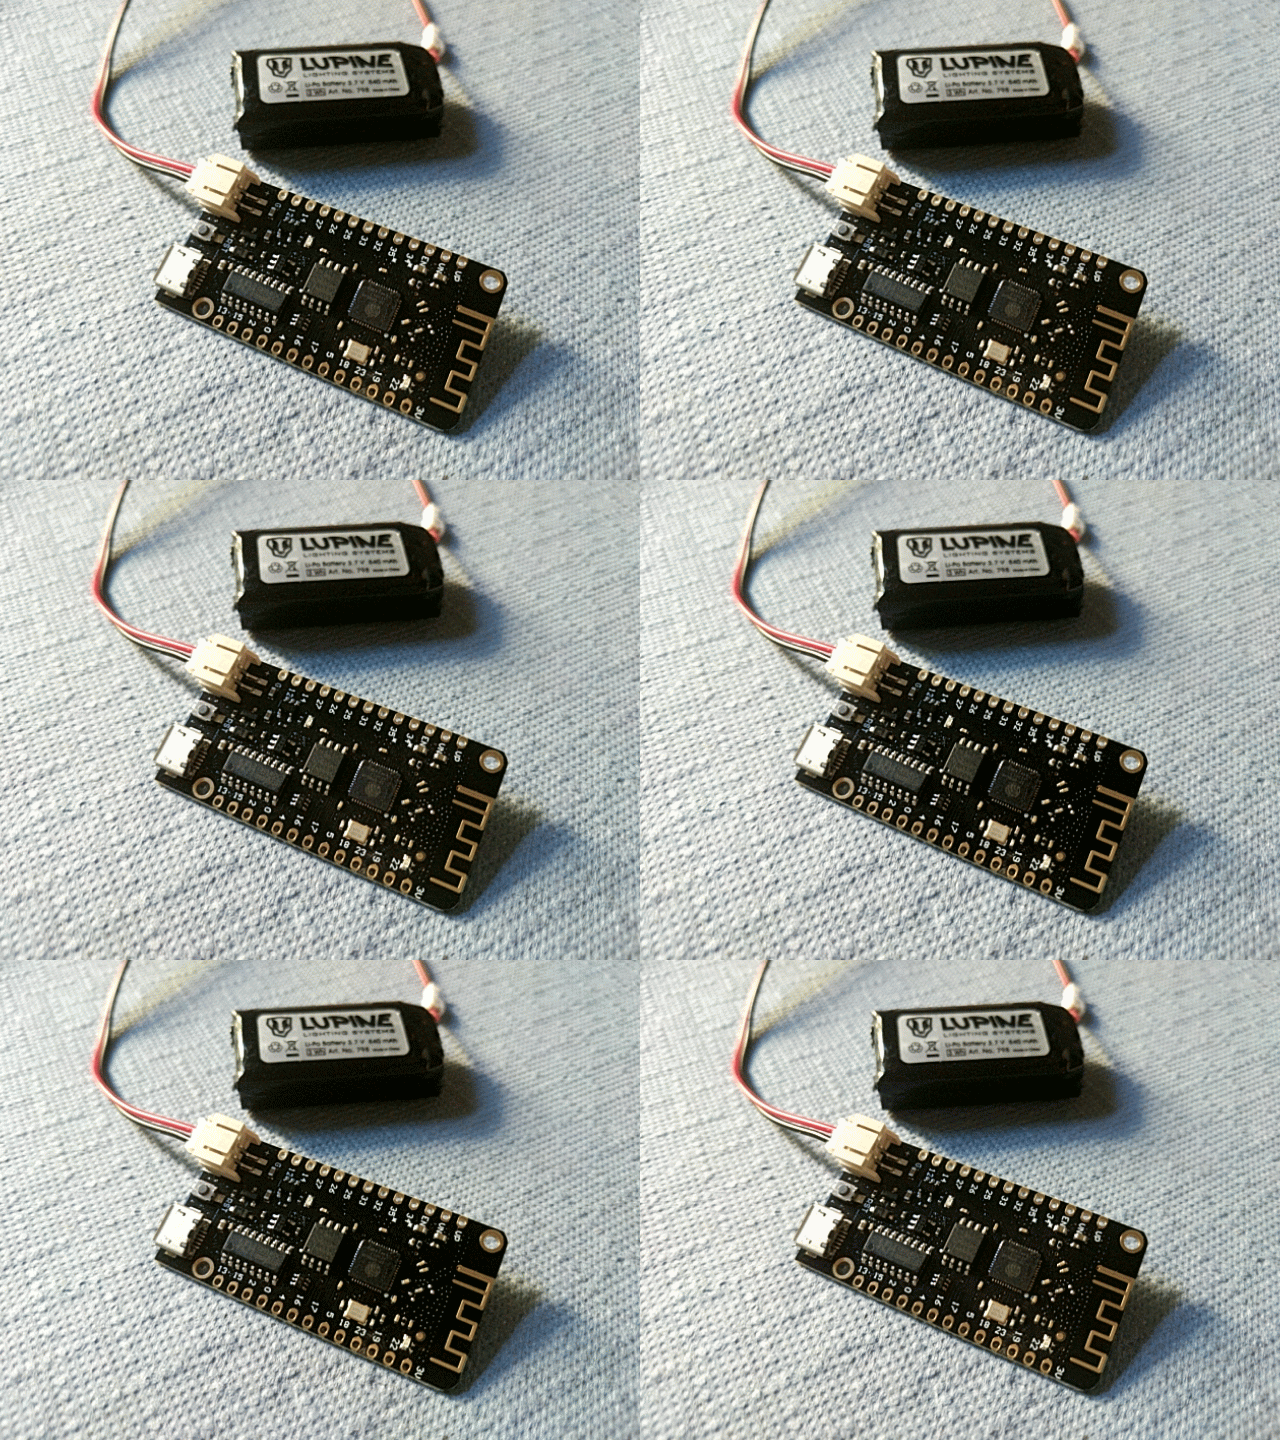
- TTGO: T3_v1, T3_v2, T3_v2.1, T-Beam
- Pycom: LoPy, LoPy4, FiPy
- WeMos: LoLin32 + [LoraNode32 shield](https://github.com/hallard/LoLin32-Lora),
LoLin32lite + [LoraNode32-Lite shield](https://github.com/hallard/LoLin32-Lite-Lora)
- Adafruit ESP32 Feather + LoRa Wing + OLED Wing, #IoT Octopus32 (Octopus + ESP32 Feather)
*SPI only*:
- Pyom: WiPy
- WeMos: LoLin32, LoLin32 Lite, WeMos D32
- Generic ESP32
Depending on board hardware following features are supported:
- LED (power/status)
- OLED Display (detailed status)
- RGB LED (colorized status)
- Button
- Silicon unique ID
- Battery voltage monitoring
- GPS (Generic serial NMEA, or Quectel L76 I2C)
- Environmental sensor (Bosch BME680 I2C)
Target platform must be selected in [platformio.ini](https://github.com/cyberman54/ESP32-Paxcounter/blob/master/platformio.ini).
# Use case
Paxcounter is a proof-of-concept device for metering passenger flows in realtime. It counts how many mobile devices are around. This gives an estimation how many people are around. Paxcounter detects Wifi and Bluetooth signals in the air, focusing on mobile devices by filtering vendor OUIs in the MAC adress.
Intention of this project is to do this without intrusion in privacy: You don't need to track people owned devices, if you just want to count them. Therefore, Paxcounter does not persistenly store MAC adresses and does no kind of fingerprinting the scanned devices.
Data is transferred to a server via a LoRaWAN network, and/or a wired SPI slave interface.
You can build this project battery powered and reach a full day uptime with a single 18650 Li-Ion cell.
This can all be done with a single small and cheap ESP32 board for less than $20.
# Hardware
**Supported ESP32 based boards**:
*LoRa & SPI*:
- Heltec: LoRa-32
- TTGO: T3_v1, T3_v2, T3_v2.1, T-Beam
- Pycom: LoPy, LoPy4, FiPy
- WeMos: LoLin32 + [LoraNode32 shield](https://github.com/hallard/LoLin32-Lora),
LoLin32lite + [LoraNode32-Lite shield](https://github.com/hallard/LoLin32-Lite-Lora)
- Adafruit ESP32 Feather + LoRa Wing + OLED Wing, #IoT Octopus32 (Octopus + ESP32 Feather)
*SPI only*:
- Pyom: WiPy
- WeMos: LoLin32, LoLin32 Lite, WeMos D32
- Generic ESP32
Depending on board hardware following features are supported:
- LED (power/status)
- OLED Display (detailed status)
- RGB LED (colorized status)
- Button
- Silicon unique ID
- Battery voltage monitoring
- GPS (Generic serial NMEA, or Quectel L76 I2C)
- Environmental sensor (Bosch BME680 I2C)
Target platform must be selected in [platformio.ini](https://github.com/cyberman54/ESP32-Paxcounter/blob/master/platformio.ini).The LoPy/LoPy4/FiPy board needs to be set manually. See these instructions how to do it. Don't forget to press on board reset button after switching between run and bootloader mode.
The original Pycom firmware is not needed, so there is no need to update it before flashing Paxcounter. Just flash the compiled paxcounter binary (.elf file) on your LoPy/LoPy4/FiPy. If you later want to go back to the Pycom firmware, download the firmware from Pycom and flash it over.
- **During runtime, using FOTA via WIFI:**
After the ESP32 board is initially flashed and has joined a LoRaWAN network, the firmware can update itself by FOTA. This process is kicked off by sending a remote control command (see below) via LoRaWAN to the board. The board then tries to connect via WIFI to a cloud service (JFrog Bintray), checks for update, and if available downloads the binary and reboots with it. If something goes wrong during this process, the board reboots back to the current version. Prerequisites for FOTA are: 1. You own a Bintray repository, 2. you pushed the update binary to the Bintray repository, 3. internet access via encrypted (WPA2) WIFI is present at the board's site, 4. WIFI credentials were set in ota.conf and initially flashed to the board. Step 2 runs automated, just enter the credentials in ota.conf and set `upload_protocol = custom` in platformio.ini. Then press build and lean back watching platformio doing build and upload.
# Legal note
**Depending on your country's laws it may be illegal to sniff wireless networks for MAC addresses. Please check and respect your country's laws before using this code!**
(e.g. US citizens may want to check [Section 18 U.S. Code § 2511](https://www.law.cornell.edu/uscode/text/18/2511) and [discussion](https://github.com/schollz/howmanypeoplearearound/issues/4) on this)
(e.g. UK citizens may want to check [Data Protection Act 1998](https://ico.org.uk/media/1560691/wi-fi-location-analytics-guidance.pdf) and [GDPR 2018](https://ico.org.uk/for-organisations/guide-to-the-general-data-protection-regulation-gdpr/key-definitions/))
(e.g. Citizens in the the Netherlands may want to read [this article](https://www.ivir.nl/publicaties/download/PrivacyInformatie_2016_6.pdf) and [this article](https://autoriteitpersoonsgegevens.nl/nl/nieuws/europese-privacytoezichthouders-publiceren-opinie-eprivacyverordening))
Note: If you use this software you do this at your own risk. That means that you alone - not the authors of this software - are responsible for the legal compliance of an application using this or build from this software and/or usage of a device created using this software. You should take special care and get prior legal advice if you plan metering passengers in public areas and/or publish data drawn from doing so.
# Privacy disclosure
Paxcounter generates identifiers for sniffed MAC adresses and collects them temporary in the device's RAM for a configurable scan cycle time (default 60 seconds). After each scan cycle the collected identifiers are cleared. Identifiers are generated by salting and hashing MAC adresses. The random salt value changes after each scan cycle. Identifiers and MAC adresses are never transferred to the LoRaWAN network. No persistent storing of MAC adresses, identifiers or timestamps and no other kind of analytics than counting are implemented in this code. Wireless networks are not touched by this code, but MAC adresses from wireless devices as well within as not within wireless networks, regardless if encrypted or unencrypted, are sniffed and processed by this code. If the bluetooth option in the code is enabled, bluetooth MACs are scanned and processed by the included BLE stack, then hashed and counted by this code.
# LED blink pattern
**Mono color LED:**
- Single Flash (50ms): seen a new Wifi or BLE device
- Quick blink (20ms on each 1/5 second): joining LoRaWAN network in progress or pending
- Small blink (10ms on each 1/2 second): LoRaWAN data transmit in progress or pending
- Long blink (200ms on each 2 seconds): LoRaWAN stack error
- Single long flash (2sec): Known beacon detected
**RGB LED:**
- Green each blink: seen a new Wifi device
- Magenta each blink: seen a new BLE device
- Yellow quick blink: joining LoRaWAN network in progress or pending
- Blue blink: LoRaWAN data transmit in progress or pending
- Red long blink: LoRaWAN stack error
- White long blink: Known Beacon detected
# Payload format
You can select different payload formats in [paxcounter.conf](src/paxcounter.conf#L12):
- ***Plain*** uses big endian format and generates json fields, e.g. useful for TTN console
- ***Packed*** uses little endian format and generates json fields
- [***CayenneLPP***](https://mydevices.com/cayenne/docs/lora/#lora-cayenne-low-power-payload-reference-implementation) generates MyDevices Cayenne readable fields
If you're using [TheThingsNetwork](https://www.thethingsnetwork.org/) (TTN) you may want to use a payload converter. Go to TTN Console - Application - Payload Formats and paste the code example below in tabs Decoder and Converter. This way your MQTT application can parse the fields `pax`, `ble` and `wifi`.
To add your device to myDevices Cayenne platform select "Cayenne-LPP" from Lora device list and use the CayenneLPP payload encoder.
To track a paxcounter device with on board GPS and at the same time contribute to TTN coverage mapping, you simply activate the [TTNmapper integration](https://www.thethingsnetwork.org/docs/applications/ttnmapper/) in TTN Console. The formats *plain* and *packed* generate the fields `latitude`, `longitude` and `hdop` required by ttnmapper.
Hereafter described is the default *plain* format, which uses MSB bit numbering. Under /TTN in this repository you find some ready-to-go decoders which you may copy to your TTN console:
[**plain_decoder.js**](src/TTN/plain_decoder.js) |
[**plain_converter.js**](src/TTN/plain_converter.js) |
[**packed_decoder.js**](src/TTN/packed_decoder.js) |
[**packed_converter.js**](src/TTN/packed_converter.js)
**Port #1:** Paxcount data
byte 1-2: Number of unique pax, first seen on Wifi
byte 3-4: Number of unique pax, first seen on Bluetooth [omited if BT disabled]
bytes 5-17: GPS data, if present, in same format as for Port #4
**Port #2:** Device status query result
byte 1-2: Battery or USB Voltage [mV], 0 if no battery probe
byte 3-10: Uptime [seconds]
byte 11: CPU temperature [°C]
bytes 12-15: Free RAM [bytes]
bytes 16-17: Last CPU reset reason [core 0, core 1]
**Port #3:** Device configuration query result
byte 1: Lora SF (7..12) [default 9]
byte 2: Lora TXpower (2..15) [default 15]
byte 3: Lora ADR (1=on, 0=off) [default 1]
byte 4: Screensaver status (1=on, 0=off) [default 0]
byte 5: Display status (1=on, 0=off) [default 0]
byte 6: Counter mode (0=cyclic unconfirmed, 1=cumulative, 2=cyclic confirmed) [default 0]
bytes 7-8: RSSI limiter threshold value (negative) [default 0]
byte 9: Lora Payload send cycle in seconds/2 (0..255) [default 120]
byte 10: Wifi channel switch interval in seconds/100 (0..255) [default 50]
byte 11: Bluetooth channel switch interval in seconds/100 (0..255) [efault 10]
byte 12: Bluetooth scanner status (1=on, 0=0ff) [default 1]
byte 13: Wifi antenna switch (0=internal, 1=external) [default 0]
byte 14: Vendorfilter mode (0=disabled, 1=enabled) [default 0]
byte 15: RGB LED luminosity (0..100 %) [default 30]
byte 16: Payload filter mask
byte 17: Beacon proximity alarm mode (1=on, 0=off) [default 0]
bytes 18-28: Software version (ASCII format, terminating with zero)
**Port #4:** GPS data (only if device has fature GPS, and GPS data is enabled and GPS has a fix)
bytes 1-4: Latitude
bytes 5-8: Longitude
byte 9: Number of satellites
bytes 10-11: HDOP
bytes 12-13: Altitude [meter]
**Port #5:** Button pressed alarm
byte 1: static value 0x01
**Port #6:** Beacon proximity alarm
byte 1: Beacon RSSI reception level
byte 2: Beacon identifier (0..255)
**Port #7:** Environmental sensor data (only if device has feature BME)
bytes 1-2: Temperature [°C]
bytes 3-4: Pressure [hPa]
bytes 5-6: Humidity [%]
bytes 7-8: Indoor air quality index (0..500), see below
Indoor air quality classification:
0-50 good
51-100 average
101-150 little bad
151-200 bad
201-300 worse
301-500 very bad
**Port #8:** Battery voltage data (only if device has feature BATT)
byte 1-2: Battery or USB Voltage [mV], 0 if no battery probe
# Remote control
The device listenes for remote control commands on LoRaWAN Port 2. Multiple commands per downlink are possible by concatenating them.
Note: all settings are stored in NVRAM and will be reloaded when device starts.
0x01 set scan RSSI limit
1 ... 255 used for wifi and bluetooth scan radius (greater values increase scan radius, values 50...110 make sense)
0 = RSSI limiter disabled [default]
0x02 set counter mode
0 = cyclic unconfirmed, mac counter reset after each wifi scan cycle, data is sent only once [default]
1 = cumulative counter, mac counter is never reset
2 = cyclic confirmed, like 0 but data is resent until confirmation by network received
0x03 set GPS data on/off
0 = GPS data off
1 = GPS data on, appends GPS data to payload, if GPS is present and has a fix [default]
0x04 set display on/off
0 = display off
1 = display on [default]
0x05 set LoRa spread factor
7 ... 12 [default: 9]
0x06 set LoRa TXpower
2 ... 15 [default: 15]
0x07 set LoRa Adaptive Data Rate mode
0 = ADR off
1 = ADR on [default]
Note: set ADR to off, if device is moving, set to on, if not.
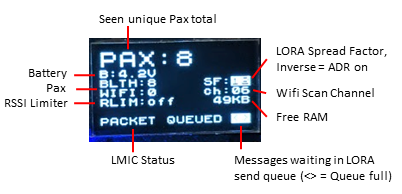
If ADR is set to on, SF value is shown inverted on display.
0x08 do nothing
useful to clear pending commands from LoRaWAN server quere, or to check RSSI on device
0x09 reset functions (send this command with confirmed ack only to avoid boot loops!)
0 = restart device
1 = reset MAC counter to zero
2 = reset device to factory settings
3 = flush send queues
9 = reboot device to OTA update via Wifi mode
0x0A set LoRaWAN payload send cycle
0 ... 255 payload send cycle in seconds/2
e.g. 120 -> payload is transmitted each 240 seconds [default]
0x0B set Wifi channel switch interval timer
0 ... 255 duration for scanning a wifi channel in seconds/100
e.g. 50 -> each channel is scanned for 500 milliseconds [default]
0x0C set Bluetooth channel switch interval timer
0 ... 255 duration for scanning a bluetooth advertising channel in seconds/100
e.g. 8 -> each channel is scanned for 80 milliseconds [default]
0x0D (NOT YET IMPLEMENTED) set BLE and WIFI vendorfilter mode
0 = disabled (use to count devices, not people)
1 = enabled [default]
0x0E set Bluetooth scanner
0 = disabled
1 = enabled [default]
0x0F set WIFI antenna switch (works on LoPy/LoPy4/FiPy only)
0 = internal antenna [default]
1 = external antenna
0x10 set RGB led luminosity (works on LoPy/LoPy4/FiPy and LoRaNode32 shield only)
0 ... 100 percentage of luminosity (100% = full light)
e.g. 50 -> 50% of luminosity [default]
0x11 set beacon proximity alarm mode on/off
0 = Beacon monitor mode off [default]
1 = Beacon monitor mode on, enables proximity alarm if test beacons are seen
0x12 set or reset a beacon MAC for proximity alarm
byte 1 = beacon ID (0..255)
bytes 2..7 = beacon MAC with 6 digits (e.g. MAC 80:ab:00:01:02:03 -> 0x80ab00010203)
0x13 set user sensor mode
byte 1 = user sensor number (1..3)
byte 2 = sensor mode (0 = disabled / 1 = enabled [default])
0x80 get device configuration
Device answers with it's current configuration on Port 3.
0x81 get device status
Device answers with it's current status on Port 2.
0x84 get device GPS status
Device answers with it's current status on Port 4.
0x85 get BME680 sensor data
Device answers with BME680 sensor data set on Port 7.
# License
Copyright 2018 Oliver Brandmueller